
Budget gaming headsets are great value until the ear pads give out. Foam compresses, fabric pills, and sweat slowly eats away at the covering until your $60 headset feels (and smells) like a Lost Ark artifact. The good news: ear pad failure is one of the most preventable problems in PC gaming. With ten minutes of care a month and a few cheap supplies, you can double or triple the lifespan of your pads — and when they finally do wear out, replacements like the $9.99 mesh memory foam pads for the Corsair Void and Void PRO, or the $10.75 Defean pads for the SteelSeries Arctis 7/9, cost less than a lunch. Skip the maintenance, though, and you’ll deal with flaking material stuck to your ears, muffled audio from collapsed foam, hygroscopic damage to the drivers from sweat, and a headset that smells like a gym bag.
What You Need
| Item | Why | Optional? |
|---|---|---|
| Microfiber cloths (2) | One for cleaning, one for drying — lint-free so fibers don’t stick to foam | No |
| Mild dish soap or gentle soap | Cuts skin oils and sweat salts without degrading adhesive or foam | No |
| Lukewarm water | Hot water warps foam and loosens glue holding pads to the frame | No |
| Soft-bristle brush (a clean toothbrush works) | Dislodges debris from mesh fabric and stitching seams | Yes |
| Rubbing alcohol (70% or less) | Sanitizes headband and pad edges on leatherette pads — use sparingly | Yes |
| Small bowl | For mixing your cleaning solution | No |
| Silica gel packs | Stored with the headset, they pull ambient moisture out of the foam | Yes |
| Replacement pads | Backup pair so you can swap in clean/dry pads while one set airs out | Yes |
Step-by-Step
1. Remove the pads properly (2 minutes)
Most budget headsets — including the Void and Arctis lines — use pads that twist off or slide over a plastic ring. Grip the pad at its edge and rotate counterclockwise about a quarter turn, or gently peel it away from the driver housing if it’s a friction fit. Never yank straight outward; that’s how mounting rings and clip tabs snap. If your pads are glued (rare, but it happens on the cheapest models), skip removal and clean them in place.
As an Amazon Associate we earn from qualifying purchases at no extra cost to you. Product prices and availability are accurate as of the date shown and are subject to change.

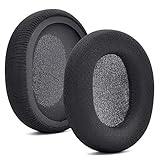
2. Dry-clean first (3 minutes)
Before any liquid touches the pads, brush off loose debris and run your fingers over the surface to catch hair and crumbs. For mesh fabric pads, brush in small circles to lift dust out of the weave. This matters because wetting dirt just pushes it deeper into the foam.
3. Wipe down with a damp cloth (3 minutes)
Dampen (do not soak) a microfiber cloth with lukewarm water and a single drop of dish soap. Wring it until it’s nearly dry — it should not drip when held upside down. Wipe the pad surface in one direction, then follow with a second cloth dampened with plain water to remove soap residue. For leatherette pads, a cloth barely touched to 70% rubbing alcohol can disinfect the contact area, but keep it off stitching, which can dry and crack.
4. Clean the mounting ring and driver grill (2 minutes)
While the pads are off, wipe the plastic ring and the driver mesh behind it with the barely damp cloth. Sweat wicks through pads and collects here, and it’s a major source of odor. Let everything air dry for 15–20 minutes before reassembly.
5. Dry the pads fully (4–12 hours, mostly passive)
Stand the pads on their edges on a towel in a well-ventilated spot, away from direct sunlight and heat vents. Press a dry microfiber cloth against the surface to blot out moisture first. Foam holds water longer than it feels like it does — reattelling damp pads traps moisture against the driver and can eventually cause corrosion or muffled sound.
6. Reattach and do a fit check (1 minute)
Line up any alignment notch on the pad with the marker on the cup, press until the ring clicks or seats evenly, then tug gently around the circumference to confirm it’s locked. An unevenly seated pad leaks bass and creates a pressure point on your ear.
7. Establish daily habits (30 seconds per session)
Wipe the pads with a dry cloth after long sessions, take your headset off when you step away (heat and pressure accelerate foam compression), and never hang the headset by one ear cup — store it on a stand so pads aren’t crushed or stressed.
Mistakes to Avoid
Machine washing. Even a gentle cycle obliterates foam density and can crack leatherette. Hand-cleaning only.
Using alcohol wipes on fabric pads. Alcohol strips the softener from mesh fabric and makes it scratchy and prone to pilling. Reserve it for hard plastics.
Blow-drying or radiator drying. Heat above roughly 120°F deforms memory foam permanently. Air dry at room temperature.
Saturating the pads. Water that soaks through to the driver housing is how a $10 cleaning mistake becomes a new headset.
Buying wrong-size replacements. Pads are not universal. Arctis 7/9 pads do not fit Arctis Nova models, and Void pads won’t fit most other brands. Match the model number exactly, and check the listed inner diameter and depth — most gaming pads run 60–70 mm across the opening with 15–25 mm of foam thickness.
Ignoring a sliding headband. A headset that sits unevenly puts all your head’s weight on one pad, compressing it weeks faster than the other.
How Often
After every long session (2+ hours): 15-second dry wipe of both pads.
Weekly: Quick brush of mesh pads to clear dust and skin flakes.
Monthly: Full removal, soap-and-water wipe-down, and 4–12 hour dry. This is the routine that genuinely extends pad life.
Every 2–3 months: Inspect for compression — a healthy pad should rebound within a second when you press it. If it holds a dent, or the covering is pilling, peeling, or thin enough to feel the foam edge through it, order replacements. For heavy daily gamers, expect stock pads on a budget headset to last 8–14 months even with good care; replacements typically run $9–$15 a pair, so budgeting one set a year keeps a $60–$100 headset feeling new well into 2026 and beyond.
When to Call a Pro or Replace
Ear pad maintenance is firmly a DIY job — there’s no scenario where a repair shop makes sense for pads themselves. But know when to stop cleaning and start replacing:
- Visible foam through the covering: the material is structurally done and will shed particles onto your skin and into the cups.
- Permanent compression: pads that have flattened to under roughly 10 mm of thickness leak bass and clamp painfully.
- Persistent odor after cleaning: bacteria have colonized the foam interior; surface cleaning won’t fix it.
- Torn mounting ring or broken clip tabs on the pad: the pad won’t seal, and glue repairs rarely hold on flexible foam.
Call a professional (or the manufacturer’s support line) only if the problem is beyond the pads: a driver that sounds distorted after a liquid incident, a snapped headband, or a cup that no longer holds its pad at all. At that point, compare the repair against simply buying new pads plus, if needed, a budget replacement headset — often the pads plus a $50–$80 backup headset wins.
FAQ
Can I use leather conditioner on leatherette gaming headset pads?
Lightly, on genuine leatherette only — a pea-sized amount rubbed in and wiped off can slow cracking. Never use it on fabric or mesh pads like the Corsair Void replacements, and keep conditioner away from the driver side entirely.
How long do replacement ear pads last compared to the originals?
Quality third-party memory foam pads usually last as long as or longer than stock pads — commonly 12–18 months with regular care — because aftermarket versions often use denser foam than the originals on budget headsets.
Why do my ear pads smell even after cleaning?
Sweat and skin oils soak through the covering into the open-cell foam, where surface wiping can’t reach. Once odor survives a full soap-and-water cleaning and drying cycle, the foam is saturated and replacement is the only real fix.
Are universal ear pads a safe bet if I can’t find my model?
Approach with caution. Check three measurements before buying: the pad’s outer diameter, inner opening, and depth, plus whether your headset uses twist-on rings or clips. A slightly mismatched pad can sit too close to the driver, causing distortion, or leave bass-leaking gaps around the cup.


